All In One Marketing Platform For Personal Trainers

 Payhip is a platform where you can simply and easily sell digital products, downloads and courses. That means many fitness business owners are already using it to provide their clients with meal templates and workout plans, as well as other related resources like progress tracking charts, recipes, and instructional documents. The good news is that Payhip has recently added a new feature to their site - the ability for business owners to offer subscription memberships instead of only making single one-off purchases. Of course, as you likely already know the subscription model is big in the fitness industry and with personal trainer websites. The reason for this is that it can provide fitness business owners with an excellent opportunity to grow their business, offer better value to their clients, and ensure a more secure, regular income. In this article, we'll discuss the benefits and features of which you cam make the most if you intend to launch online fitness memberships or sell digital products. Payhip Membership Features There are so many things you can do with Payhip membership tools. The first is to set a trial period so your customers can get a taste of what they are getting before they sign-up properly. Next, you can use it to set billings that reoccur over 3 or 6 months, or even a custom time, you can offer packages at all price points. You can also use Payhip’s membership options to create a variety of membership plans including different benefits to give your customers the best value. Additionally, the Payhip membership options allow you to create your own titles, add your own description and upload an icon for each package that will appear at the checkout. You can even add a custom banner related to your fitness business. Thereby ensuring your packages are properly branded and optimized. Of course, you can add additional products to your plans as well, so it's easy to update any of your membership packages with new content, something that is particularly useful for those running weekly options with new workout and meal plans. In addition to the specific actions you can take using the membership options listed above, you will also be able to use Payhip's general features. These include cross-platform access for your customers so they can use their home PC, laptop, tablet, or mobile. You'll also be able to manage customers' accounts easily. This means you can cancel, or check the billing history whenever necessary and answer any client queries, fast. Another great feature of Payhil is that you can use it to enhance the security of your business and gain customer trust. This is because it offers encrypted transactions, and payment options, as well as the option of integrations so you can seamlessly set up your own fitness membership website. Which Payhip Plan Is Right for You? Payhip offers a range of membership plans to suit all budgets and needs. Let's see what these are and how they can help you build your membership services. 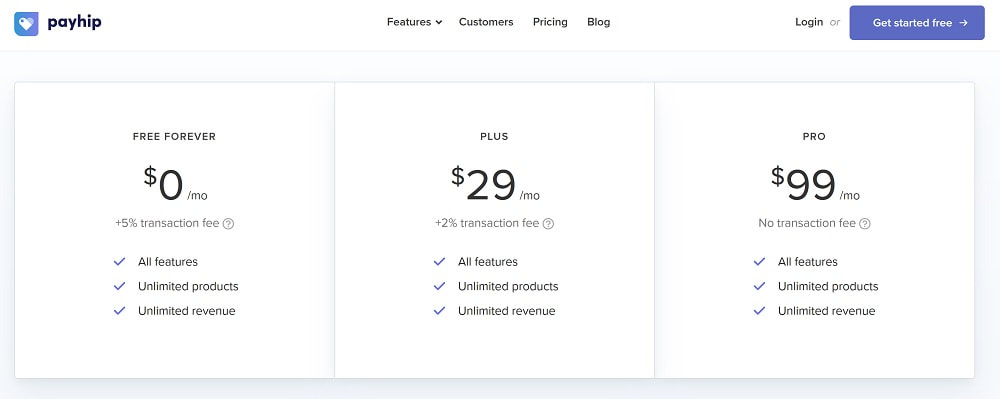 The Free Forever Plan This plan is free to join and gives you access to the platform so you can set up as many products and services as you need. The good news is that there is no limit on the income you can earn from the basic plan. (In fact, there is no limit on the revenue you can make with any of Payhip’s membership plans!) Although it is worth noting that there is a 5% charge every time a client makes a transaction. With that in mind, the Forever Free Plan is usually best for smaller fitness businesses, at the point of dipping their toe in the subscription package waters, as well as those that are looking to try out Payhip’s services to see if they are relevant to their business. The Plus Plan The Plus Plan comes with a $29 monthly fee. You'll get access to the exact same features as with the free plan, however in exchange for the monthly fee, transactions will be only charged a 2% transaction fee. Because of that this plan is suitable for personal trainers running medium sized operations where you can afford that monthly charge to save a lot more on your transactions and thus earn more from these transactions. The Pro Plan Last of all is the Pro Plan. This is priced at $99 per month, and just like with the others, there is no limit to the revenue you can earn or the number of plans you can create. The big benefit of choosing the Pro plan is that no transaction fees will be charged whatsoever. Of course, this means the professional plan is best suited to larger fitness businesses where the monthly fee would be a drip in the ocean compared to the revenue coming through the membership services or products. How Do Payhip Membership Tools Benefit Your Business? In addition to the specific features discussed above, there are some pretty impressive advantages to using a Payhip membership account for your fitness business. These include being able to cancel your membership to Payhip at any time, so you know you won't have to pay out for something that isn't helping you bring in revenue. A Payhip membership also enables your clients to subscribe using secure online third party payment providers like Stripe, and Paypal. Payhip is also great for your fitness business because it pays you as soon as the client pays, which means you don't need to wait until one specific day of the month to access cash flow for your business. Transactions fees are super affordable too. Of course, one of the most critical advantages of using Payhip for your membership needs is that it allows you to transform your fitness business by using the subscription model, all without the use of coding skills or technical configuration. The Cons of Using Payhip In the interest of fairness, there are some less stellar things you need to know about the Payhip membership tools too. One of these is that they do not offer the option to upsell your client, so you'll still need to manage that manually. Also, it's worth noting that in addition to the fees that Payhip charges, the third-party payment provider will still want their cut. So, yes, Stripe and Paypal will continue to take their regular fees. Although the good news is that if you think carefully about your prices before you launch your subscription plans you can offset this within the price, meaning you won't end up out of pocket. Set Up a Fitness Membership Website with Payhip Now you know all about the benefits, features and pricing of the Payhip membership tools, you are probably wondering how to use them. Well, the interface couldn't be easier, all you need to do is follow the instructions below to create your first subscription plan. Then you can securely embed a link to the plan you have created and sell memberships directly through your blog or website. Simple! Step 1. Create Your Payhip Account Join Payhip and set up an account. The subscription membership features are offered on all plans. This means you won't have to pay a dime while testing the system, only when you start selling. To get started, click the top right button 'Get Started Free' on the top right of Payhip's Home page and as a first step you'll need to add your email address and create a password on the following screen. 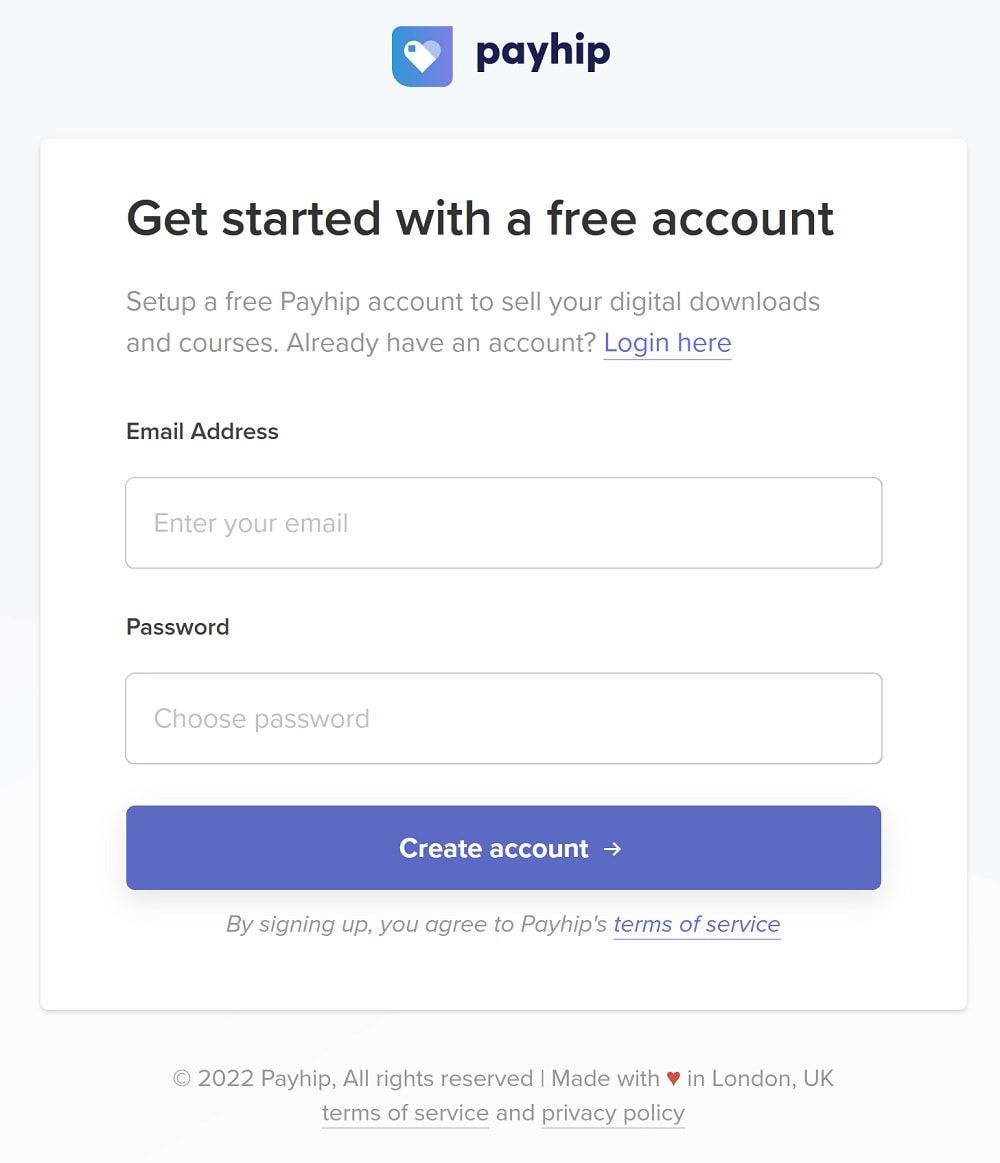 Then Payhip will want to know your business name: 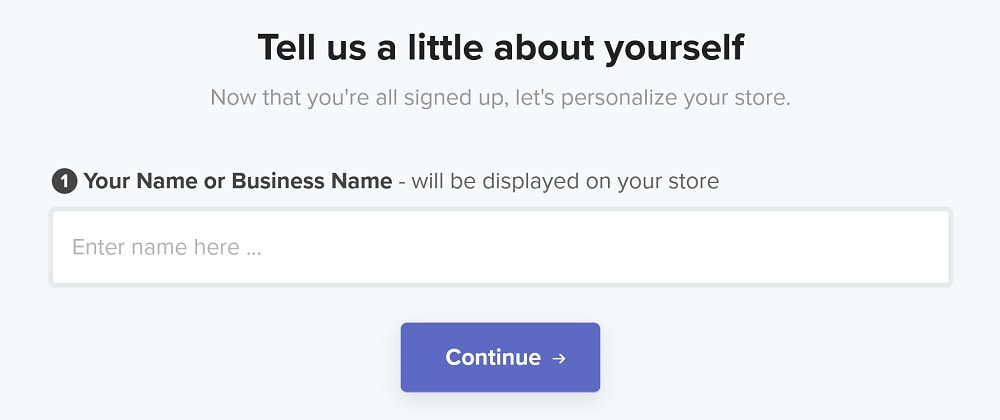 Once you added that, you'll be asked what you'd like the name of the Store to be. This will show on the storefront, in the URL of your store and also on all communications with clients. 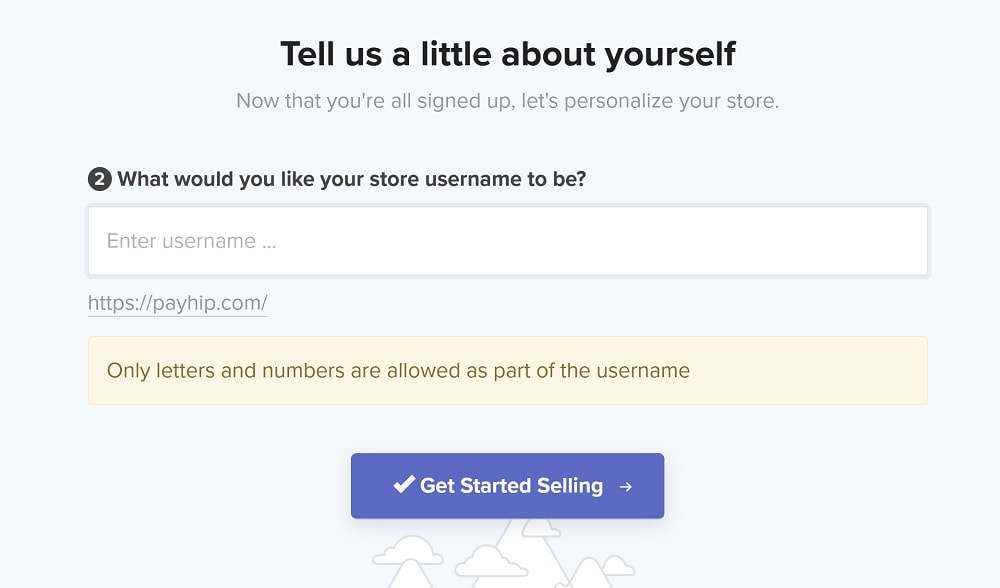 When you click the Get Started Selling button, you'll be taken to the dashboard where Payhip will tell you what else you'll need to set-up to start selling your products. Step 2. Add Your Service So, once you've done the essentials, you can move onto adding your first service. Click the 'Add your first product' button. 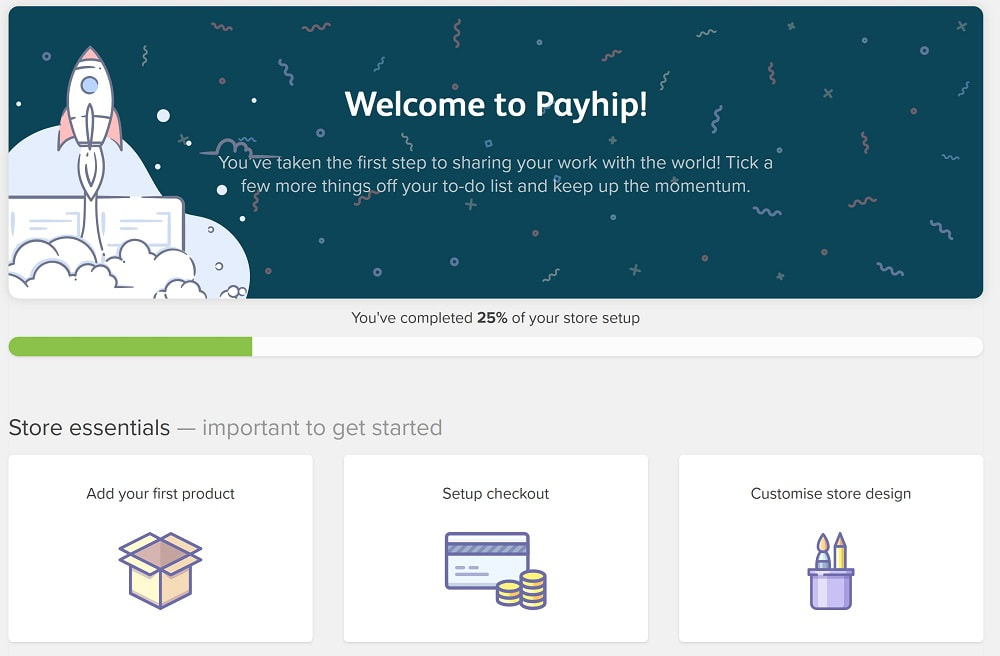 You'll see a pop-up where you'll need to choose 'Add Product' to move onto the next screen where you can choose the type of product you'd like to add. There will be a Show More button on the the bottom to reveal the subscription option.  As you can see, there are 5 different product types, so you can sell apparel and goodies, digital products, an online course, one-off coaching service and a subscription based membership service as well. We'll be focusing that last one and will go into the details of how to set it up. Step 3. Create Your Plan Now, if you haven't set up a Stripe account yet, Payhip will prompt you to do so in order to be able to set-up a subscription based product. If you haven't got one yet, it will also offer you to register one there and then within the Payhip dashboard. You can't skip this step as it's essential. Once you logged in or registered your Stripe account, Payhip will give you an option to link your PayPal to your Payhip account through your Account Settings. This is where you can also set your default currency and statement text for clients. 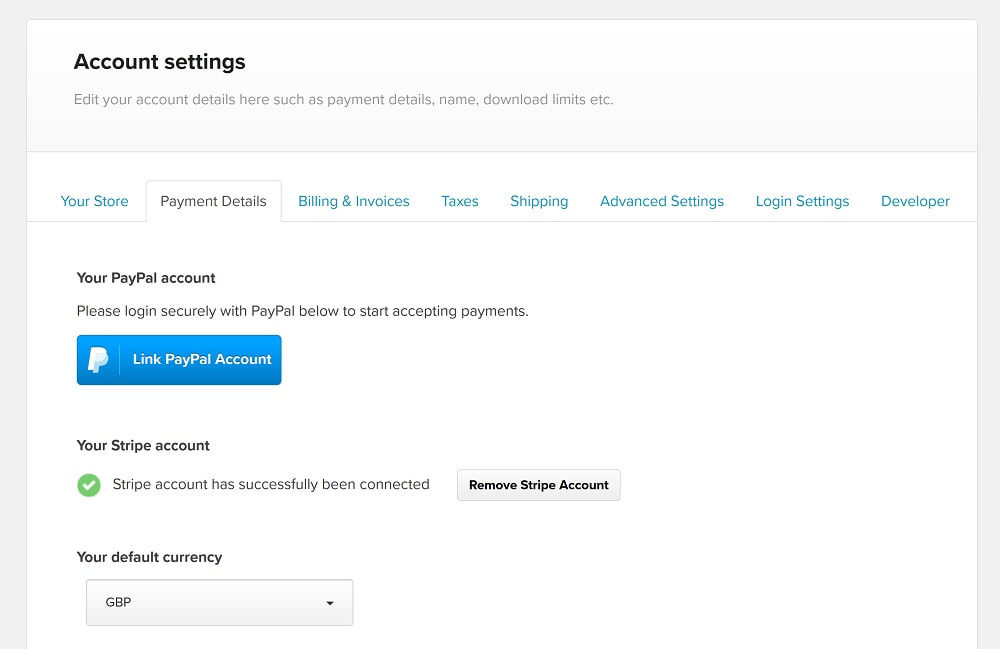 Once you've set up everything here, you can click the Save button at the bottom. Then choose 'Products' at the top navigation and click 'Add Product'. You'll have to choose the Product type again. When you hit 'Subscription Billing' this time, you'll be taken to the plan creation page. Here you can enter all the details of the product into the relevant fields. There you will be able to add the name of your fitness product, the price you will charge your customer, and how often you will bill them - weekly, monthly, yearly etc. 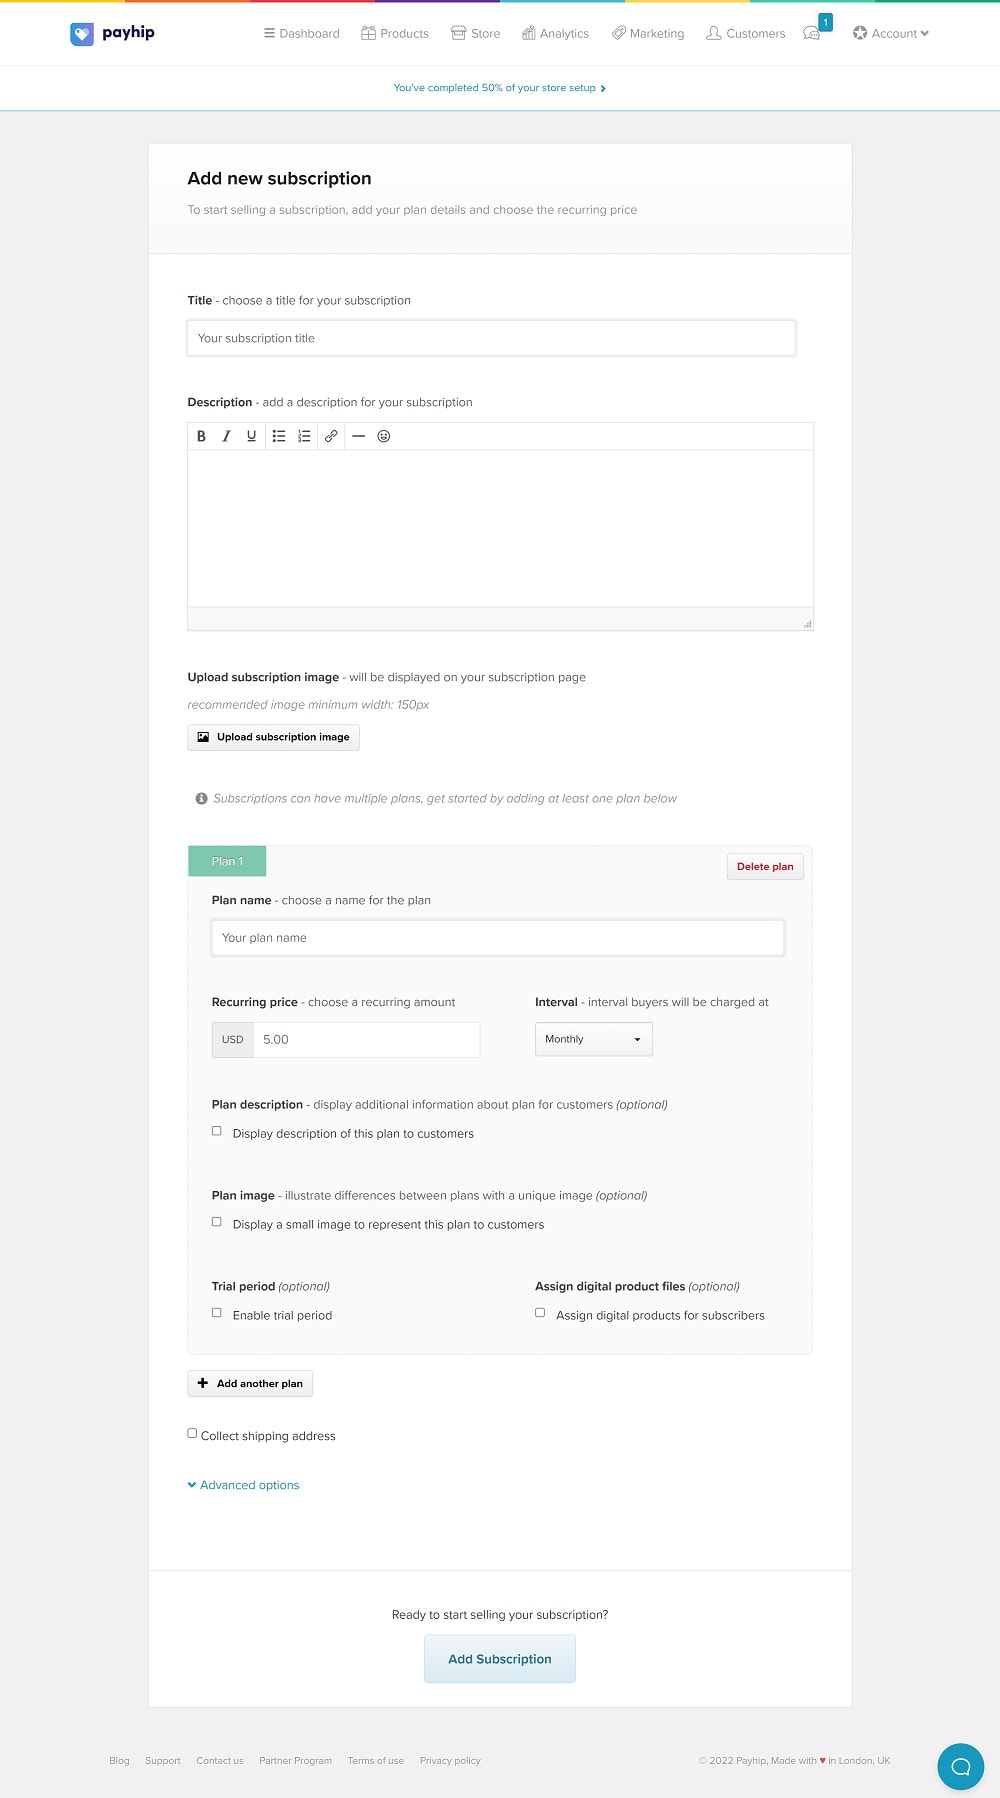 You will also be able to add a plan description on this page. It's optional, but it's usually best if you include this as it will give your customers additional information on which to make their buying decision. You will be able to choose whether to enable a trial period on your plan where clients get to use it for a while without having to pay as well. This may sound counterintuitive, but it's one of the best ways of demonstrating to your customers that your product is worth the fee. Finally from the plan creation page, you can tick a box to enable you to add specific digital products to the plan such as exercise routines, videos, eBooks, and documents for your clients to download. That is your first plan completed! When you're ready, click the 'Add Subscription' button at the bottom. Payhip will confirm that the subscription was added. 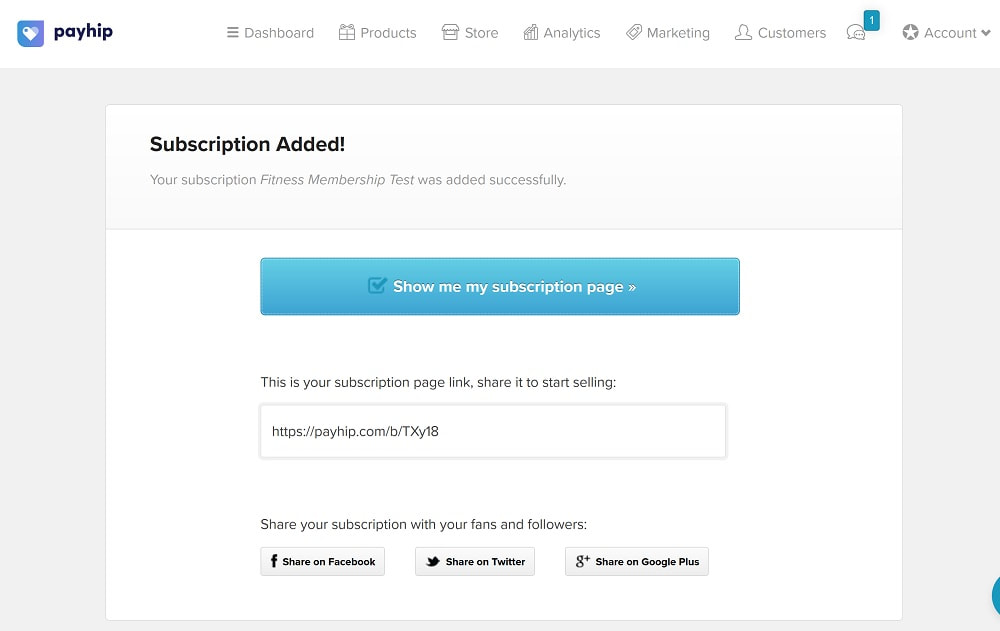 The link displayed on this screen is important because you will need to use it to integrate into the Services page of your personal trainer website. Step 4. Integrate Your Membership Subscription to Your Website Now, this is the part where you may need the help of your fitness website designer if you have one. They will ask you to send them the URL to your membership plan or plans and they will be able to add this to a button under the respective fitness membership services.
If you look after your website yourself, you'll need to login to your website editor, find the page where you promote your fitness membership and add that URL on the last screen. This way your website visitors will be redirected to your Payhip subscription page when they click that button. |
Our All In One Platform
Check out out all in one business & marketing platform for personal trainers!

WEBSITE BUILDER | FUNNELS |MEMBERSHIPS | SCHEDULING| EMAIL MARKETING| PAYMENTS| CRM | AI ASSISTANT | SURVEYS
Popular Articles
Trusted Partners
We work closely with some of the best service providers in the fitness industry.


Categories
All
|